In this article we will detail the installation of the Kafka application using the Strimzi operator. Indeed, with the increasingly regular arrival of Cloud Native applications, Dev/Ops experts are increasingly called upon to deploy Kafka in order to ensure communication between the different APIs. Doing so in a Kubernetes context is becoming more and more regular. We will therefore deploy, using the tool Helm3, a Kafka cluster within a Kubernetes cluster K3d .
What is Strimzi
Strimzi provides the means to run an Apache Kafka cluster on Kubernetes in various deployment configurations. For development, it is easy to configure a cluster in K3d for example in a few minutes. For production, you can customize the cluster to suit your needs, using features such as rack awareness to distribute Kafka brokers across different Availability Zones, and “Taints and Tolerations” features to run Kafka on nodes dedicated to your Kubernetes cluster. You can expose Kafka outside of Kubernetes using NodePort, Load Balancer, Ingress, and/or OpenShift routes, depending on your needs, and these are easily secured using TLS.
Kafka’s native management is not limited to the broker. You can also manage Kafka topics, users, Kafka MirrorMaker, and Kafka Connect using custom resources. This means you can use your familiar Kubernetes processes and tools to manage full Kafka applications.
Using Strimzi also means benefiting from a set of Charts that allow you, via Helm, to manage your Kafka resources.
Objective of the tutorial
In this article we will deploy a Kafka cluster, Kafka bridge and a topic named TopicTest in a Kubernetes cluster within a namespace that we will name Kafka. All of these elements will be created using the deployment of a Helm chart which will use the strimzi operator after having deployed it.
Prerequisites
You must have access to a Kubernetes cluster on your development computer. For this article we will use K3d, but you can also use Kind or Minikube.
You must also have the basic knowledge around the creation of Chart Helm.
Added chart helm strimzi registry
In a terminal run the following command:
helm repo add strimzi https://strimzi.io/charts/
You can verify that the registry has been added by running the following command:
helm repo list
which should give you the following result:

Creation of the skeleton of our Chart
In a terminal run the following command to create the skeleton of our chart:
helm3 create kafka
You should obtain the following tree structure, which corresponds to a basic chart:
📦kafka
 ┣ 📂charts
 ┣ 📂templates
 ┃ ┣ 📂tests
 ┃ ┃ ┗ 📜test-connection.yaml
 ┃ ┣ 📜NOTES.txt
 ┃ ┣ 📜_helpers.tpl
 ┃ ┣ 📜deployment.yaml
 ┃ ┣ 📜hpa.yaml
 ┃ ┣ 📜ingress.yaml
 ┃ ┣ 📜service.yaml
 ┃ ┗ 📜serviceaccount.yaml
 ┣ 📜.helmignore
 ┣ 📜Chart.yaml
 ┗ 📜values.yaml
Delete unnecessary files, because we don’t need deployment, hpa, ingress, service or even service account. After the cleaning step, our chart looks like this:
📦kafka
 ┣ 📂charts
 ┣ 📂templates
 ┃ ┣ 📂tests
 ┃ ┗ 📜_helpers.tpl
 ┣ 📜.helmignore
 ┣ 📜Chart.yaml
 ┗ 📜values.yaml
Added Strimzi operator chart dependency
As said above, the deployment of the Strimzi operator (actually operators) can be done using a Helm chart. We will therefore use the chart dependency mechanism to force the installation of the operator before the deployment of our chart.
In the Chart.yaml file, add the following content:
dependencies:
- name: strimzi-kafka-operator
  version: "0.21.1"
  repository: "https://strimzi.io/charts/"
Kafka cluster, topic and Kafka bridge declaration
Editing your values.yaml file
Replace the content of your Values.yaml file with the following content:
serviceAccount:
  create: true
  annotations: {}
  name: "kafka-cluster-serviceaccount"

kafka:
  name: 'Kafka-cluster'
  replicas: 3
  config:
    offsets:
      topic:
        replication:
          factor: 3
    transaction:
      state:
        log:
          replication:
            factor: 3
          min:
            isr: 2
  storage:
    volume:
      size: 1Mi

zookeeper:
  replicas: 3
  storage:
    size: 1Mi

topic:
  partitions: 3
  replicas: 3
  retention:
    ms: 7200000
  segment:
    bytes: 1073741824
  topics:
  - name: 'topictest'

kafkaMonitoring:
  enabled: true

prometheus-kafka-exporter:
  image:
    repository: "danielqsj/Kafka-exporter"
Creation of the Kafka cluster
Created a kafkacluster.yaml file in your chart’s template folder with the following content:
---
apiVersion: kafka.strimzi.io/v1beta1
kind: Kafka
metadata:
  name: {{ .Values.kafka.name }}
spec:
  kafka:
    version: 2.6.0
    replicas: {{ .Values.kafka.replicas }}
    listeners:
      - name: plain
        port: 9092
        type: internal
        tls: false
      - name: tls
        port: 9093
        type: internal
        tls: true
    config:
      offsets.topic.replication.factor: {{ .Values.kafka.config.offsets.topic.replication.factor }}
      transaction.state.log.replication.factor: {{ .Values.kafka.config.transaction.state.log.replication.factor }}
      transaction.state.log.min.isr: {{ .Values.kafka.config.transaction.state.log.min.isr }}
      log.message.format.version: "2.6"
      inter.broker.protocol.version: "2.6"
    storage:
      type: jbod
      volumes:
      - id: 0
        type: persistent-claim
        size: {{ .Values.kafka.storage.volume.size }}
        deleteClaim: false
  zookeeper:
    replicas: {{ .Values.zookeeper.replicas }}
    storage:
      type: persistent-claim
      size: {{ .Values.zookeeper.storage.size }}
      deleteClaim: false
  entityOperator:
    topicOperator: {}
    userOperator: {}
Topic creation
Create a kafkatopic.yaml file in your chart’s template folder with the following content
{{- $root := . -}}
{{- range $.Values.topic.topics }}
---
apiVersion: kafka.strimzi.io/v1beta1
kind: KafkaTopic
metadata:
  name: {{ .name | lower | quote }}
  labels:
    strimzi.io/cluster: {{ $root.Values.kafka.name }}
spec:
  partitions: {{ $root.Values.topic.partitions }}
  replicas: {{ $root.Values.topic.replicas }}
  config:
    retention.ms:  {{ $root.Values.topic.retention.ms }}
    segment.bytes:  {{ $root.Values.topic.segment.bytes }}
{{- end}}
This file will loop on the topic.topics variable of the value file to request the creation of our topic.
Creation of the Kafka bridge
In the template folder of your chart, create a kafkabridge.yaml file and position the following content:
---
apiVersion: kafka.strimzi.io/v1alpha1
kind: KafkaBridge
metadata:
  name:  {{ .Values.kafka.name }}-bridge
spec:
  replicas: 1
  bootstrapServers:  {{ .Values.kafka.name }}-kafka-bootstrap:9092
  http:
    port: 8080
Mise à jour des dépendances de chart
Avant de déployer votre chart il convient de mettre à jour les dependances de ce dernier. Pour cela lancer la commande suivante dans un terminal:
helm dependency update ./Kafka/
You should get the following result:

This command has the effect of downloading the chart in the /charts folder of your Chart.
installation of your chart and result
To install your chart run the following command:
helm install -n Kafka Kafka ./Kafka/ --create-namespace
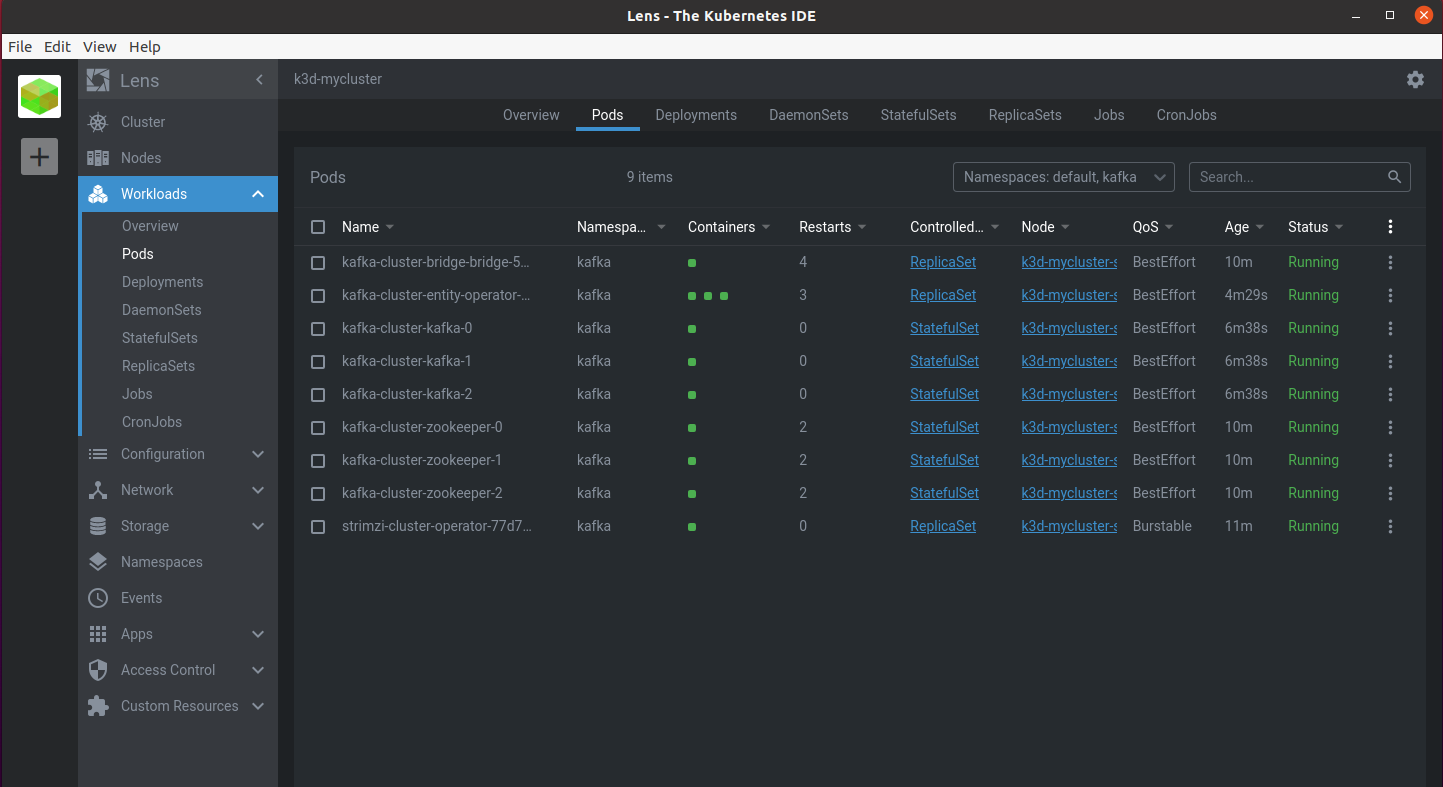
After a few minutes you will see in your cluster that all the Kafka Pods are there:
- the strimzi operator
- the zookeeper cluster dedicated to the kakfa infrastructure
- the Kafka cluster itself
- Kafka bridge pod
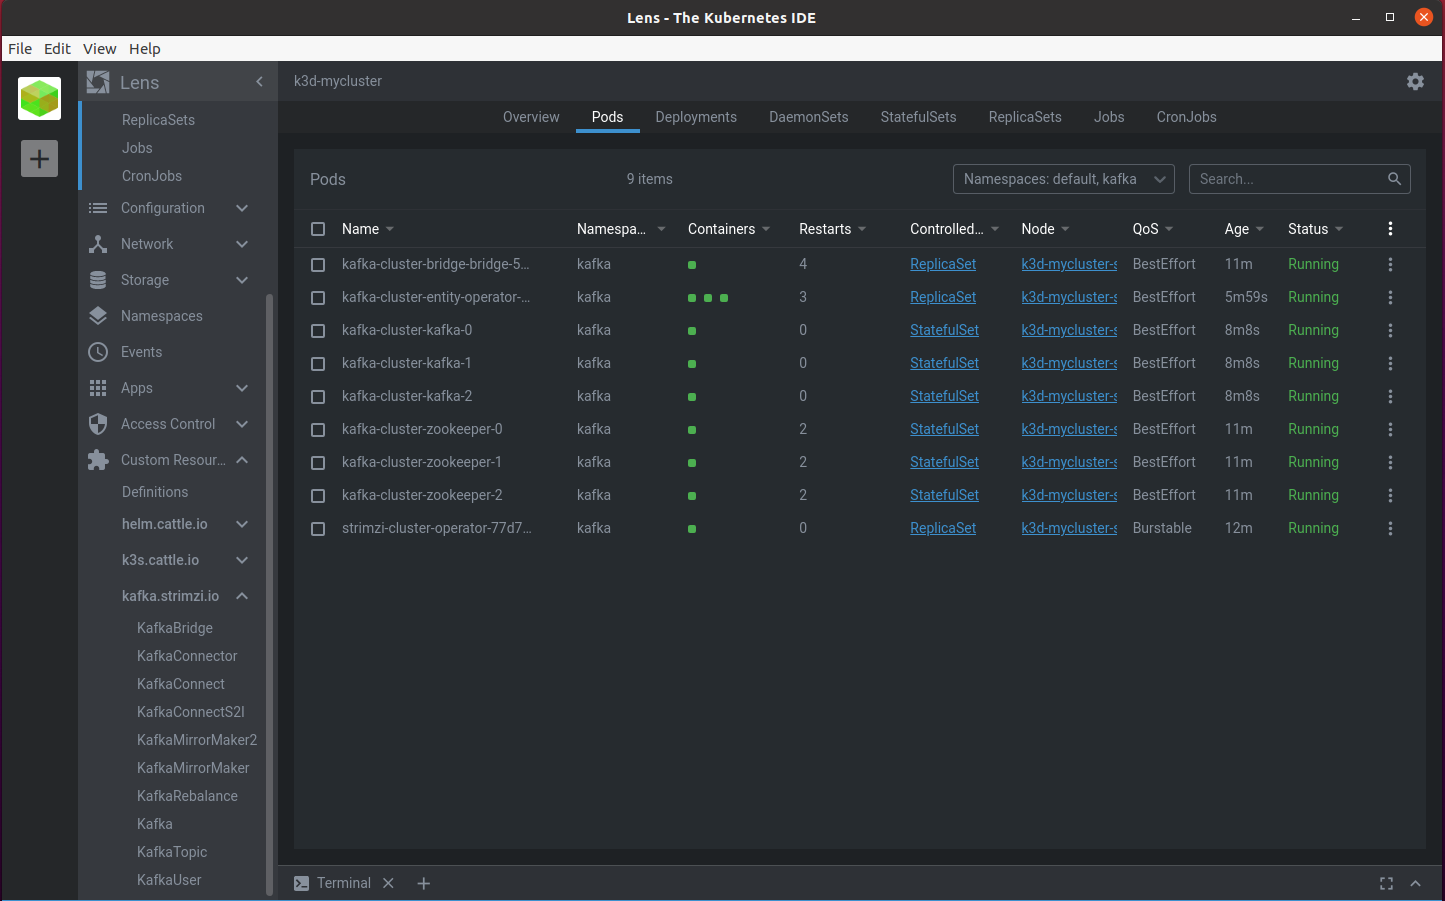
and that the strimzi operator’s custom resources are present:
To access the source code of this example, it’s here https://github.com/matthieupetite/helm-samples